
Drip Irrigation for Vegetable Gardens: Spacing and Layout
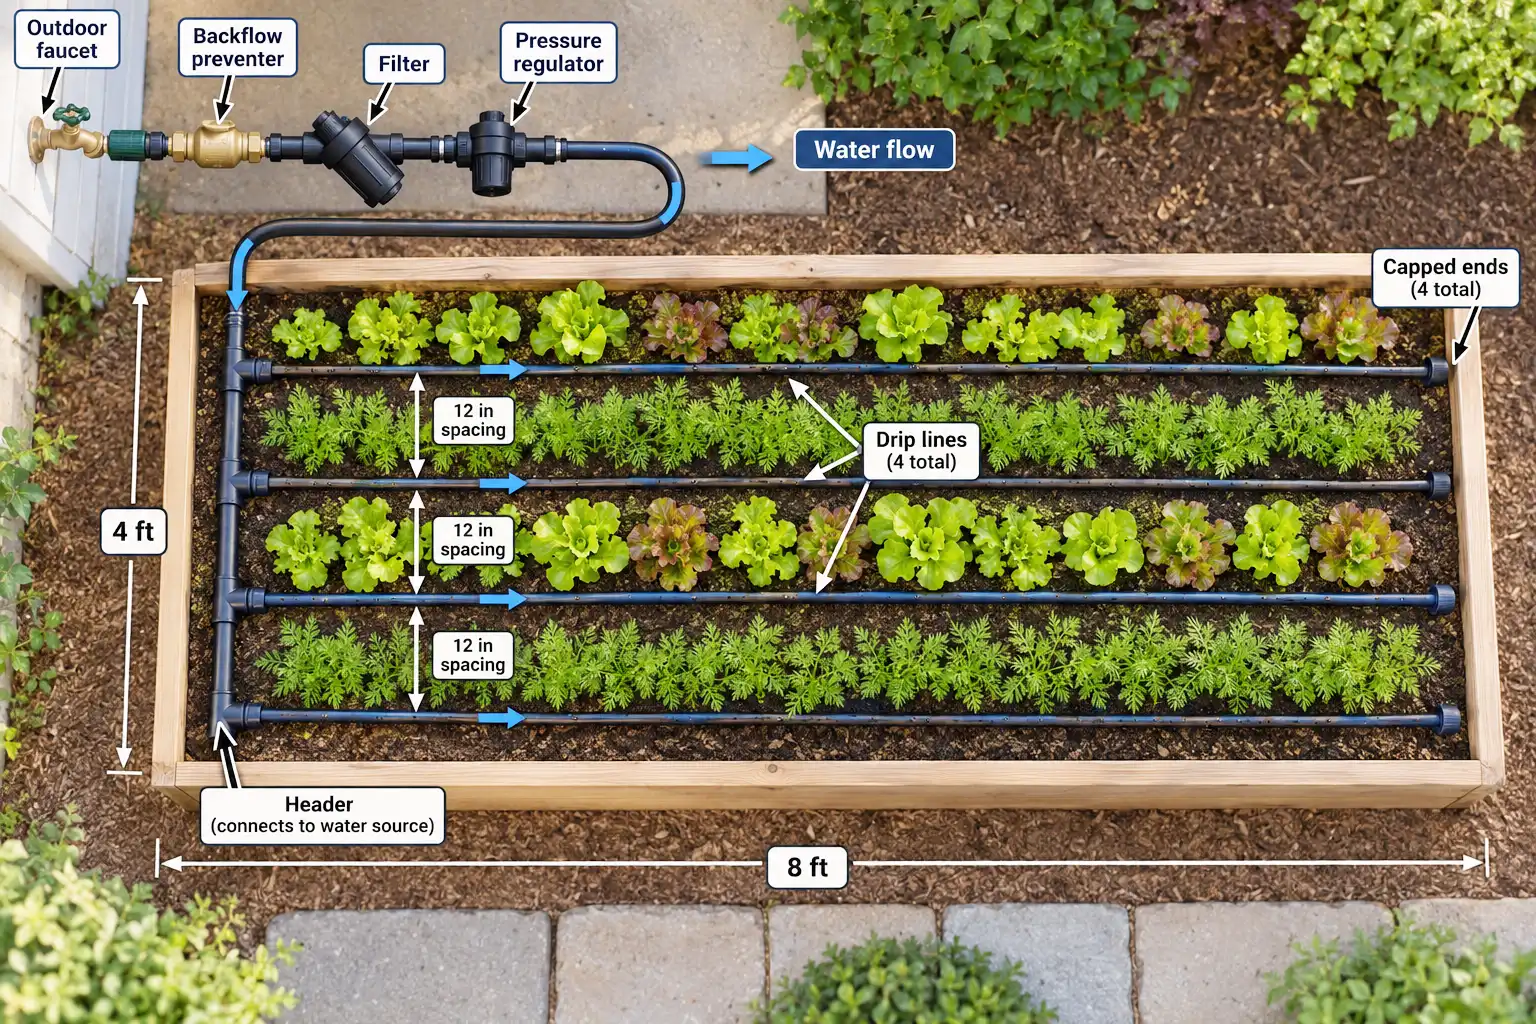
Drip irrigation for vegetable gardens is easiest when one supply tube feeds several short watering lines. The right layout depends on your crops, bed width, and soil. A small raised bed provides a useful starting point that you can expand later.
Drip irrigation for vegetable gardens can start with one short header on a 4-by-8-foot bed. For carrots or lettuce, run four lines lengthwise, 12 inches apart. Add a filter and pressure regulator, then check moisture before timing.
Drip Irrigation for Vegetable Gardens: The Basic Layout
A simple drip irrigation system has three main sections: a water supply, a header, and drip lines.
The supply tube carries water from your outdoor faucet to the garden. The header distributes that water across one end of the bed. Parallel drip lines then release moisture into the planted soil.
The basic connection looks like this:
Outdoor faucet > Backflow preventer > Optional timer > Filter > Pressure regulator > Supply tube > Header > Drip lines
Follow the component manufacturer’s connection order, since integrated timers and filter-regulator units can differ.
For a 4-by-8-foot raised bed containing closely planted vegetables, the layout is straightforward:
- Place the header across one 4-foot end.
- Run four drip lines along the 8-foot length.
- Space the lines 12 inches apart.
- Close their far ends with removable caps.
This follows the raised-bed arrangement described in Colorado State University Extension’s irrigation guidance, reviewed in May 2023.
The lines can rest on the soil surface beneath mulch. No trenching is needed for this small layout.
Choose Drip Line Spacing for Your Vegetables
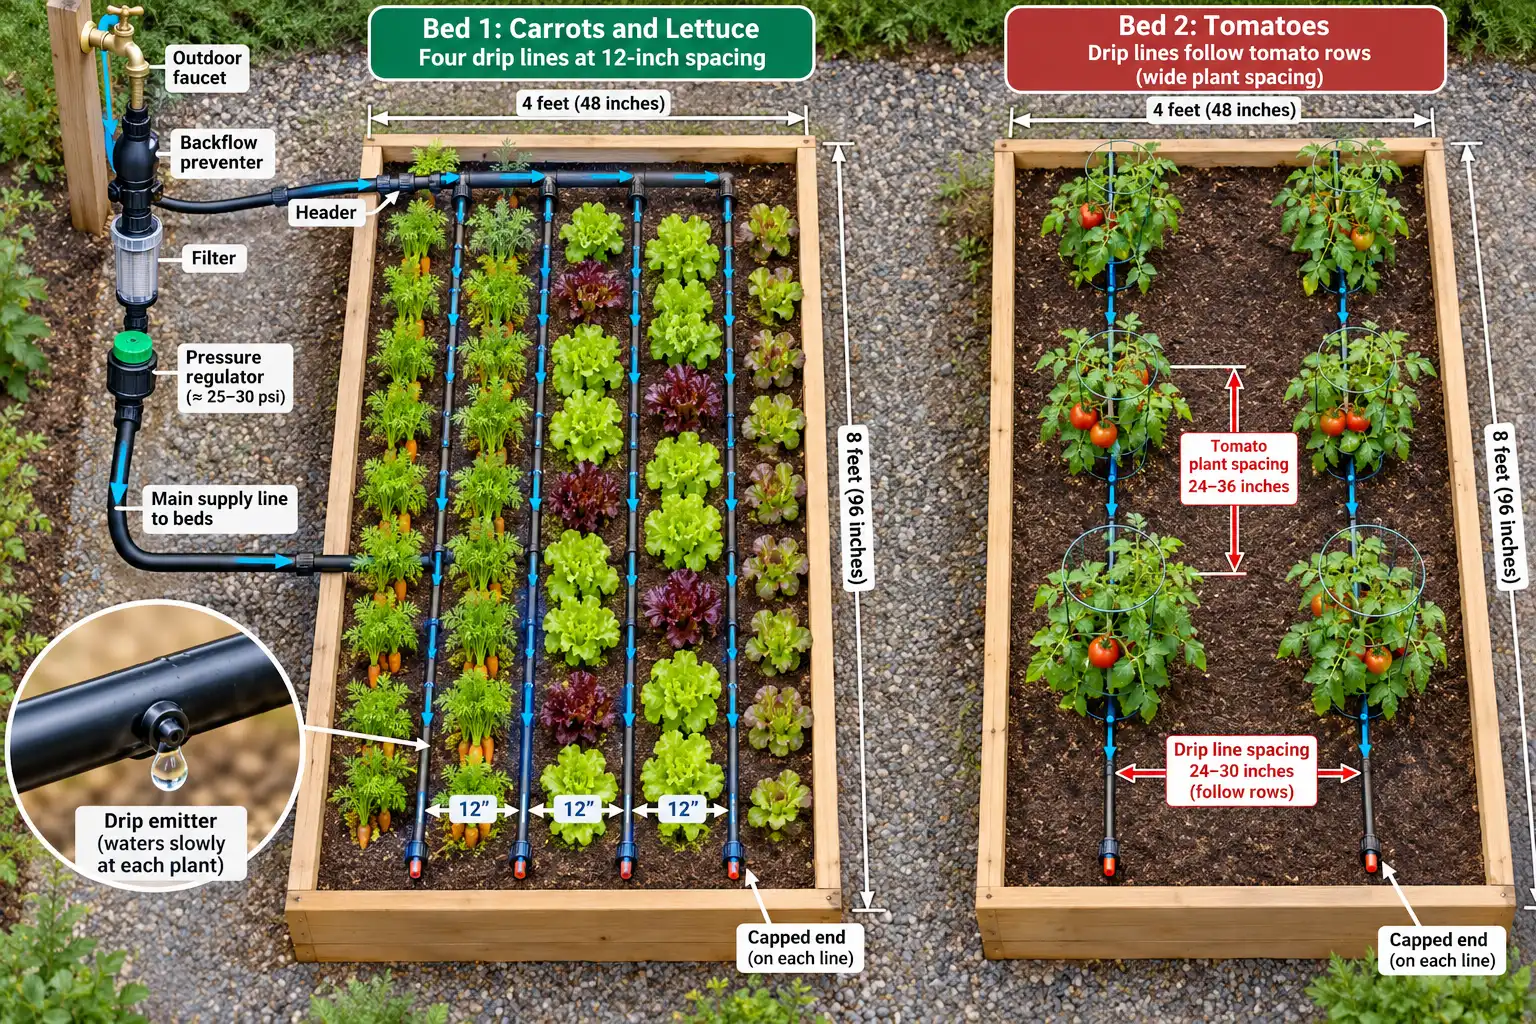
The best line arrangement follows the planted area rather than the bed frame alone.
For a 4-foot-wide bed, four equally spaced lines provide a practical layout for densely planted carrots and leafy greens. Wider-spaced crops may need fewer lines positioned closer to their individual rows.
| Vegetable arrangement | Starting layout |
|---|---|
| Carrots and closely planted lettuce | Four lengthwise lines in a 4-foot-wide bed, spaced 12 inches apart |
| Corn or cabbage planted in three rows | Three lengthwise lines, following Colorado State’s raised-bed example |
| Tomatoes or peppers planted in separate rows | Start with a line along each planted row and check root-zone coverage |
| Individual vegetables in irregular positions | Consider separate point-source emitters near each plant |
Why soil type changes the spacing
Sandy soil allows water to move downward more quickly and spread less sideways. Clay-rich soil usually spreads moisture farther horizontally but drains more slowly.
The University of Maryland Extension’s 2024 drip irrigation guidance describes drip lines spaced 18 to 24 inches apart in many wider beds. It recommends 9 to 12 inches in coarse sandy soils.
Colorado State’s 12-inch raised-bed layout and Maryland’s wider spacing address different growing conditions.
These are starting arrangements, not universal requirements. Check the actual wetting pattern before adding or removing lines.
What Parts Do You Need?
Choose your drip tubing and its rated water pressure before selecting the other components. Mismatched parts can cause leaks, clogged emitters, or uneven watering.
A faucet-fed system does not need an electric pump when the available water pressure and flow are suitable.
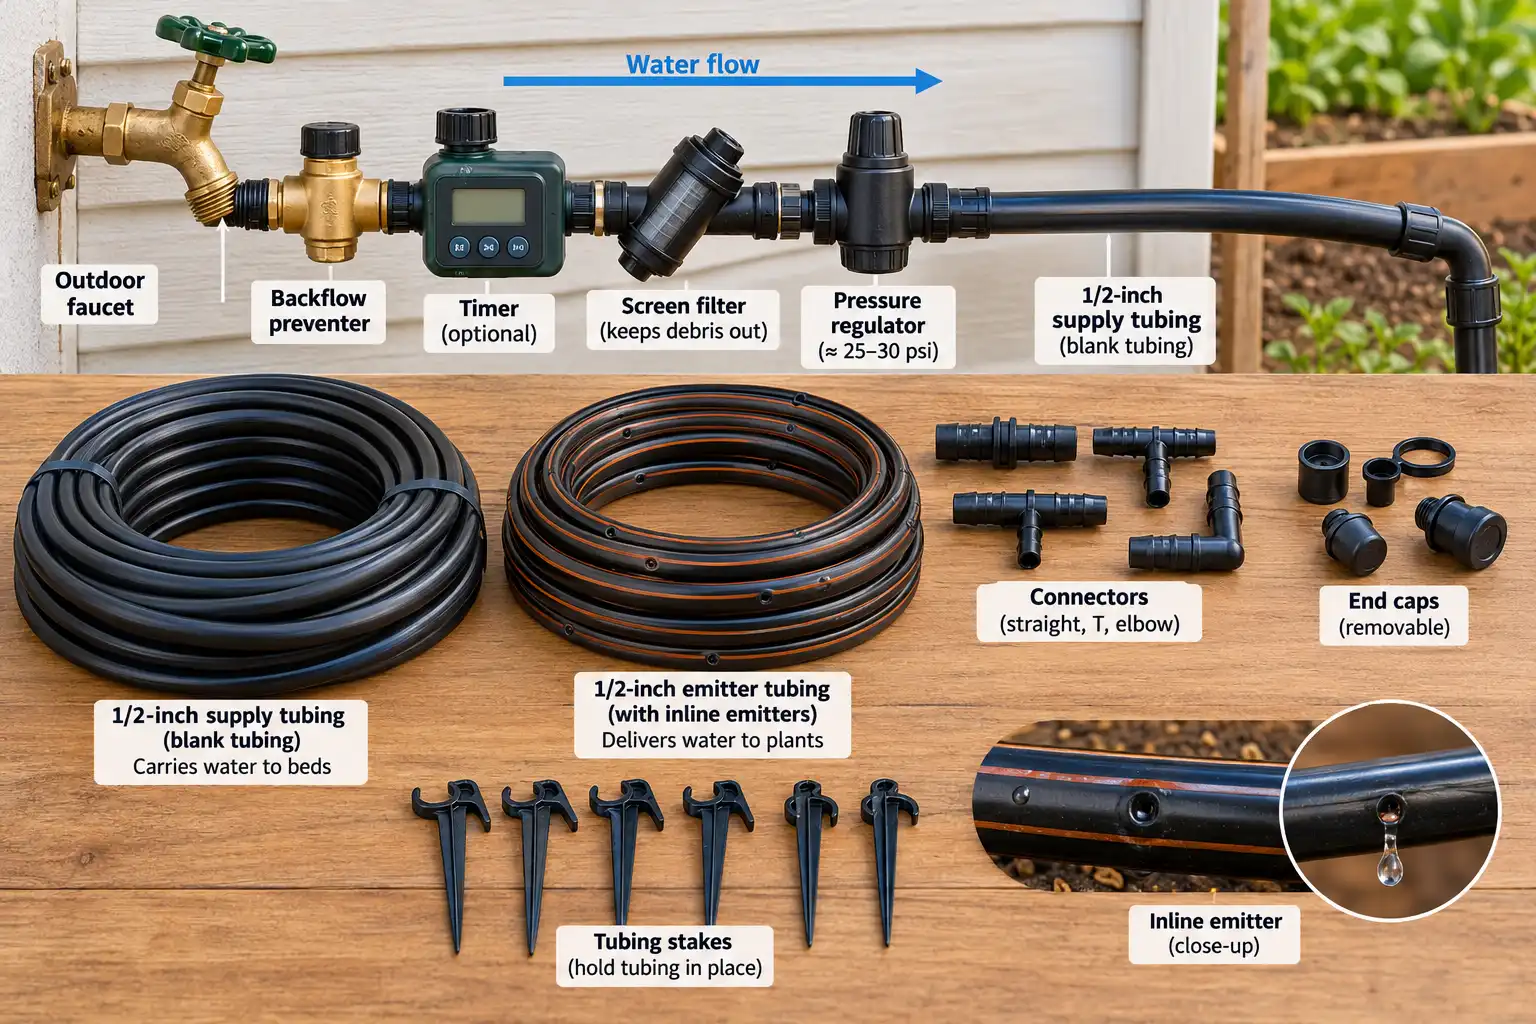
| Component | Purpose |
|---|---|
| Backflow preventer | Protects the drinking-water supply from reverse flow |
| Filter | Captures sediment that could block emitters |
| Pressure regulator | Reduces faucet pressure to the tubing’s rated operating pressure |
| Blank supply tubing | Carries water from the faucet to the beds |
| Header tubing | Distributes water into individual drip lines |
| Inline emitter tubing | Releases water at regular intervals |
| Connectors and end caps | Join tubing and close line ends |
| Ground stakes | Keep tubing positioned safely |
| Battery timer (optional) | Automates watering duration and frequency |
Check pressure and filter compatibility
Different drip products need different operating pressures.
Maryland Extension describes drip tape operating around 8 to 10 psi. The 2025 USU Extension backyard drip guide describes many home systems designed for 10 to 30 psi.
For filtration, Iowa State Extension discusses a 100-mesh screen, while USU describes 120 to 200 mesh for many systems.
Use the pressure and filtration specifications required by your actual emitters. Neither pressure nor filter mesh should be chosen from a universal rule.
Install a Simple Drip Irrigation System in Six Steps
Once the parts are compatible, most small raised-bed systems can be assembled above ground.
- Draw the layout. Mark the outdoor faucet, bed dimensions, crop rows, and walking paths. Keep supply tubing away from places where feet or tools may damage it.
- Connect the faucet components. Fit a locally compliant backflow device, optional battery timer, filter, and matching pressure regulator. Follow the manufacturers’ connection instructions.
- Position the header. Run blank supply tubing to the bed. Place a short header along one 4-foot end and close its unused end.
- Connect the watering lines. For the four-line example, position laterals approximately 6, 18, 30, and 42 inches from one side. Trim the lengths to fit and use matching connectors.
- Flush the system. Leave the line ends open initially. Run clean water through the tubing to clear debris. Shut off the supply, then attach removable end caps.
- Test and secure everything. Turn on the system, inspect connectors, and confirm the farthest emitters work. Stake the tubing down and check where the water spreads.
Use tubing cutters carefully and protect your hands from sharp edges. If installing buried supply piping, contact 811 before excavation. Leave permanent plumbing changes to a qualified professional.
How Long Should Drip Irrigation Run?
Calculate an initial runtime from emitter flow, then verify it by checking soil moisture. Fixed watering schedules can deliver too much or too little water.
Worked example: A 4-by-8-foot vegetable bed
Assume your bed contains closely planted lettuce and uses:
| Input | Value |
|---|---|
| Bed area | 32 square feet |
| Parallel drip lines | 4 |
| Length per line | 8 feet |
| Emitter spacing | 12 inches |
| Emitters per line | 8 |
| Rated flow per emitter | 0.5 gallon/hour |
These assumptions give 32 emitters, provided each line has eight functioning outlets.
Step 1: Calculate system output.
32 emitters x 0.5 gallon/hour = 16 gallons/hour
Step 2: Calculate a half-inch equivalent of water over the bed.
One inch of water over one square foot equals approximately 0.623 gallon.
32 square feet x 0.5 inch x 0.623 = 9.97 gallons
Step 3: Calculate runtime.
9.97 gallons / 16 gallons/hour = 0.623 hour
That equals approximately 37 minutes.
This agrees with USU Extension’s published application rate of approximately 0.8 inch/hour for 0.5-gallon/hour emitters spaced 12 inches apart in both directions.
The 37-minute result is an illustrative half-inch application, not a daily or weekly recommendation. It assumes rated flow and does not guarantee uniform wetting.
Check the soil before setting a schedule
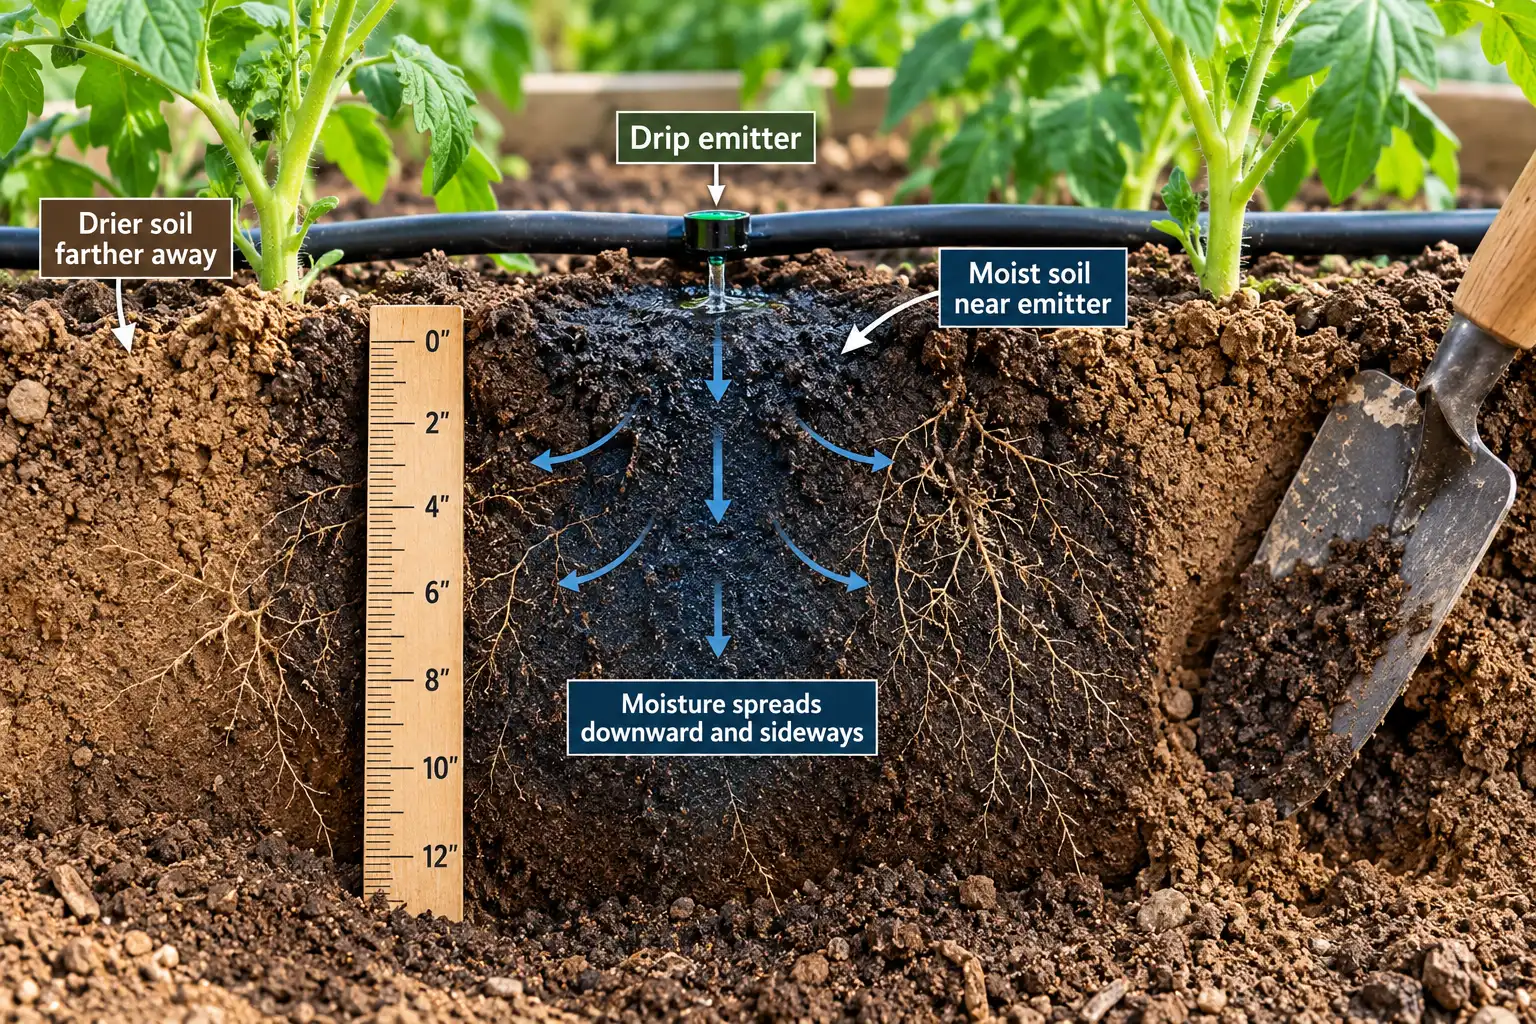
After a trial run, inspect soil near the first and last emitters. Also check midway between two lines.
Colorado State Extension advises checking moisture when the upper 2 to 4 inches become dry. A trowel or soil probe can also inspect conditions around 6 to 8 inches deep.
If the root zone remains dry, adjust line placement or watering duration. If the soil stays saturated, reduce irrigation.
Repeat these checks during hot weather and as your vegetables mature.
Adapt the Layout to Soil and Crop Needs
Different vegetables do not always need the same watering frequency.
For sandy soil
Sandy beds may need closer drip lines or more frequent, shorter watering events. Check for dry gaps between emitters before increasing runtime.
For clay-rich soil
Clay holds water longer. Allow enough time for moisture to move into the rooting area, but avoid keeping the soil continuously saturated.
For tomatoes and peppers
Place emitters where they wet the developing root zone. A single line along each planting row provides a starting arrangement. Add coverage if the wetted area is too narrow.
For leafy greens and root vegetables
Lettuce, spinach, carrots, and similar crops benefit from steady soil moisture. However, the upper soil layer needs particular attention while direct-sown crops are germinating.
You can use gentle surface watering during establishment if drip does not keep the seedbed uniformly moist.
These differences explain why soil observation is more useful than automatically giving every crop the same watering period.
How to Connect Two or More Raised Beds
Use one main supply tube to carry water alongside the beds. Connect a separate header to each bed.
For beds that need similar watering conditions, the headers may operate together on one irrigation zone.
If the beds contain crops with substantially different watering needs, use separate valves or irrigation zones.
Before expanding, check the available faucet flow.
USU Extension describes measuring water delivery by timing how long a 5-gallon bucket takes to fill. You can convert the result into gallons per hour and compare it with the combined emitter demand.
Also check the tubing manufacturer’s maximum line length and pressure limits. Splitting a large arrangement into smaller zones may improve distribution.
For containers and herb pots, point-source emitters may be easier to control than tubing intended for long vegetable rows.
Common Drip Irrigation Problems and Fixes
Most small-system failures involve blocked emitters, loose connectors, poor coverage, or incorrect watering duration.
| Problem | What to check |
|---|---|
| Soil stays dry near one plant | Check the nearest emitter for a blockage or poor placement |
| Last emitters release less water | Inspect for kinks, inadequate pressure, excessive line length, or a clogged filter |
| A connector leaks | Turn off the water and check tubing size, fitting compatibility, and the joint |
| Water collects on the surface | Shorten irrigation periods and inspect drainage before adding more water |
| Dry strips remain between lines | Move lines closer or add coverage after checking the wetting pattern |
| Plants receive uneven moisture | Compare the first and last emitters and check soil texture differences |
Do not increase faucet pressure to compensate for a blocked line. Doing so may damage low-pressure tubing and fittings.
For sediment-related blockages, clean the filter and flush tubing through its removable end caps.
Maintain Your Drip System Throughout the Season
A little maintenance helps keep water delivery consistent.
The USU Extension guide recommends inspecting and cleaning filters about monthly during the growing season. Sediment-heavy water may require more frequent attention.
Also inspect the lines for crushing, animal damage, blocked outlets, and loose connections.
Once the layout works, place suitable mulch over the drip tubing. Keep access to connectors and end caps. Mulch helps reduce soil moisture loss and protects exposed tubing from sunlight.
In freezing climates, disconnect and drain the system before winter. Store timers, regulators, and backflow devices according to their manufacturers’ instructions.
The Iowa State Extension drip irrigation guide, reviewed in February 2026, also recommends draining lines and protecting removable components during winter.
Frequently Asked Questions
Can a rain barrel supply a vegetable garden drip system?
Sometimes, but gravity-fed barrels may not provide enough pressure for standard emitters. Sediment can also clog the tubing. Check the required operating pressure, filtration, and suitability of the water source for edible crops.
Is a soaker hose the same as drip irrigation tubing?
No. A soaker hose releases water through its porous surface, while emitter tubing delivers water through spaced outlets. Both can water vegetables, but their flow patterns and watering calculations differ.
Should drip tape emitters face up or down?
For flat drip tape, Maryland Extension recommends positioning emitter openings upward to limit sediment buildup. Other emitter tubing may have different installation requirements. Always follow the specific tubing manufacturer’s orientation instructions.
Can drip irrigation water newly planted carrot seeds?
Yes, if the seedbed stays consistently moist. However, drip may leave the surface dry between lines. The USU Vegetable Production Guide recommends sprinkler watering for root crop establishment, followed by drip or furrow irrigation.
Does a drip irrigation timer need to run every day?
No. Watering frequency depends on soil texture, recent rainfall, crop growth, and weather. Check moisture before establishing a schedule, then adjust it when conditions change rather than relying on the same daily runtime.
Can one drip system water raised beds and container herbs?
Yes, if the water distribution suits both. Containers often need different emitter placement and watering frequency. Separate valves or zones make it easier to keep the root zones appropriately moist without overwatering either area.
Start With One Bed and Test the Coverage
A practical drip irrigation layout begins with a short header and watering lines positioned near the crops. Build the simplest arrangement that covers the rooting area, confirm the emitter output, and check the soil before relying on a timer.
Correct coverage matters more than adding extra tubing.