
How to Start a Vegetable Garden: A Practical First-Year Plan
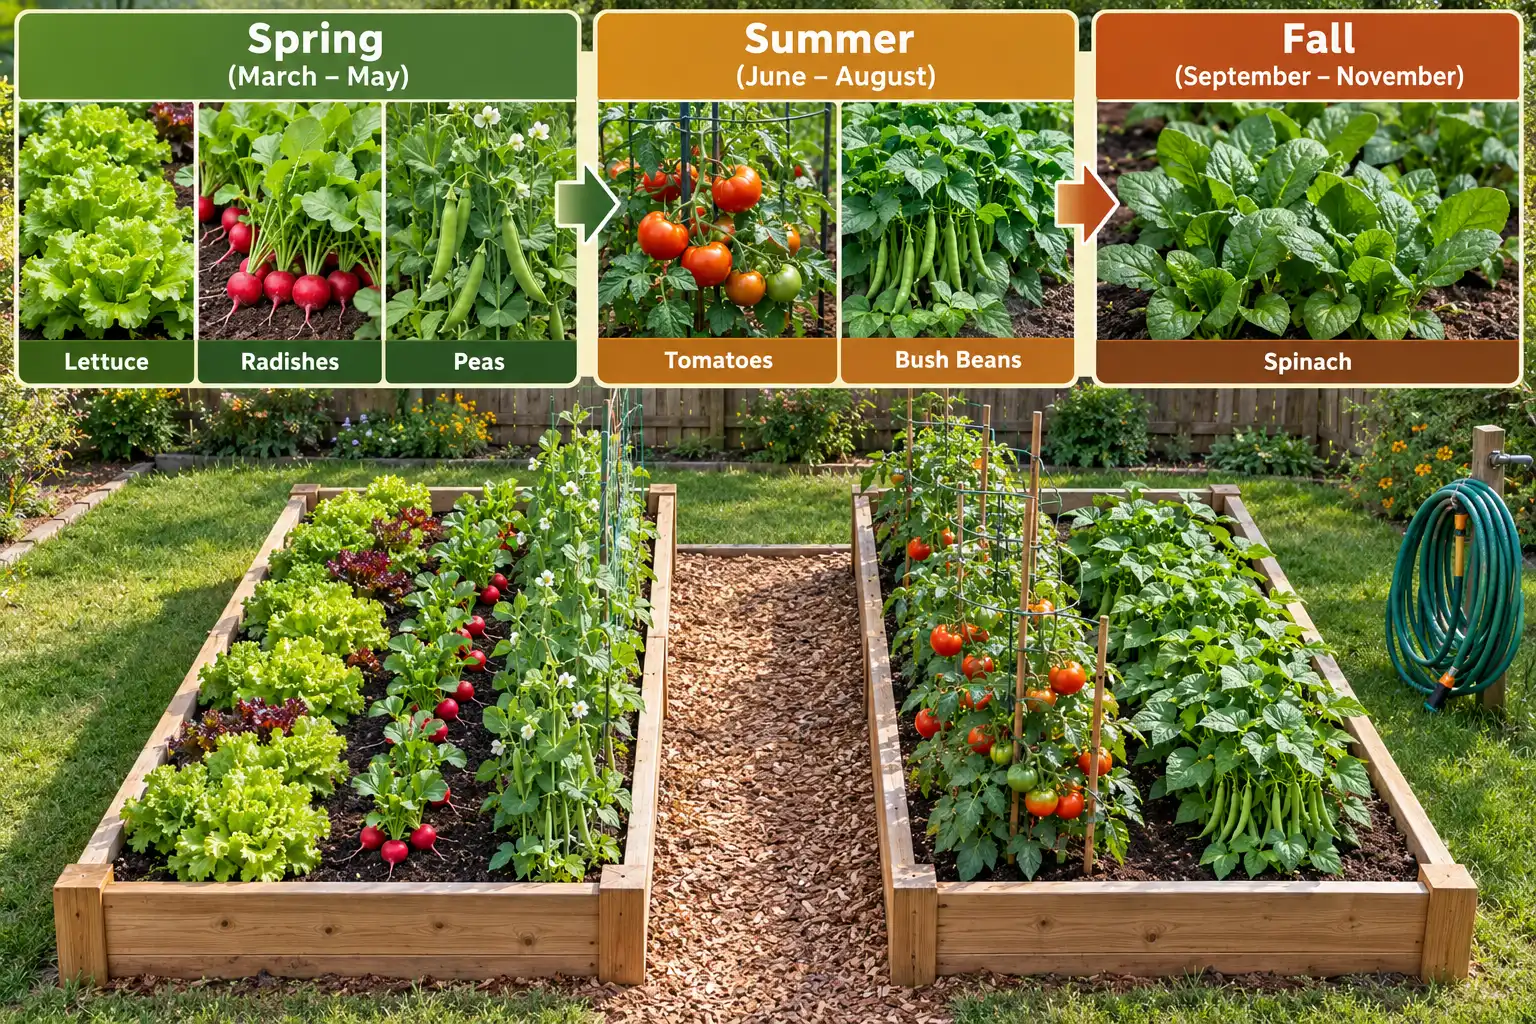
Learning how to start a vegetable garden becomes manageable when the first year has clear limits: a small sunny area, a short crop list, and planting dates that fit your region. Build the rest of the plan around those decisions.
To learn how to start a vegetable garden, choose a site with at least six hours of direct sun, prepare safe soil, grow a few seasonal crops, water according to soil conditions, and keep records before expanding.
How to Start a Vegetable Garden With a Small First-Year Layout
Start with one manageable bed, not a large patch of newly cleared ground. University of Maryland Extension’s March 2026 planning guide suggests 25 to 50 square feet for beginners. Its February 2026 starting guide suggests 50 to 75 square feet. These are flexible recommendations, not competing minimums.
A 4-by-8-foot bed has 32 square feet. Two such beds provide 64 square feet. Therefore, a single bed suits a smaller start, while two allow spring, summer, and fall plantings without a large garden.
Choose three to five crops you already eat. Sketch each bed and leave a walking path outside its planted area. Taller crops belong toward the north or west to reduce shading. If you cannot tend two beds regularly, plant one well.
Choose a Site Before Choosing Crops
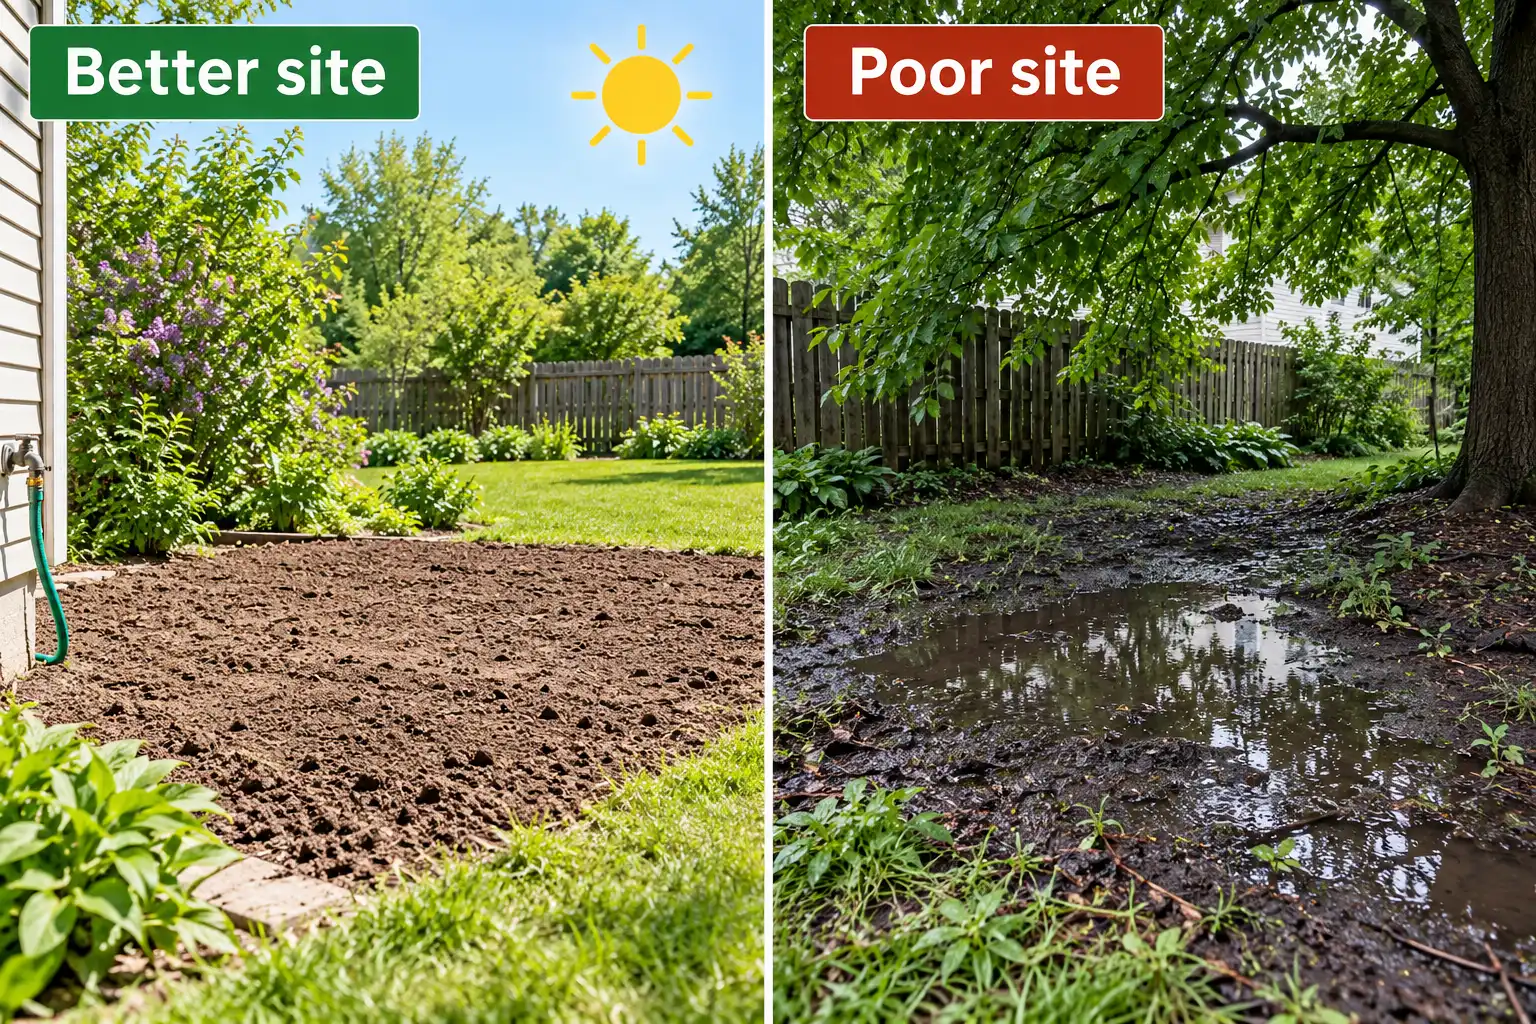
Aim for at least six hours of direct sunlight each day. The University of Maryland Extension uses this as its minimum for a general vegetable plot. Its tomato guidance favors more sunlight, while leaf lettuce can tolerate some partial shade.
Check the proposed location in the morning, at midday, and late in the afternoon. Watch whether roofs, fences, and trees block the sun. Keep the plot close enough to a faucet that watering is convenient.
Also inspect the ground after rain. Standing water, compacted soil, and tree roots make a poor starting site. Avoid placing edible beds beside old painted structures, busy roads, or areas with unknown fill until the soil has been assessed.
Decide Between In-Ground Beds, Raised Beds, and Containers
Choose the growing format that solves an actual site problem. Raised beds are optional, not a requirement for starting vegetables.
| Format | When it makes sense | Main limitation |
|---|---|---|
| In-ground bed | Your native soil is safe, drains well, and is easy to work | Existing grass, compaction, or poor drainage takes preparation |
| Raised bed | You want defined paths or need to improve the planting area | Filling it takes material, and raised soil dries faster |
| Containers | You have a sunny patio or little usable ground | Potting mix dries quickly and roots need sufficient room |
For beds on pavement, Maryland Extension’s 2026 guidance calls for at least 8 inches of growing medium for lettuce and bush beans and 12 to 24 inches for tomatoes. Beds open to safe soil below can provide additional root space.
Use containers with drainage holes and a growing mix designed for containers. Before any deep digging or post installation, contact 811 to locate underground utilities. Wear gloves, avoid lifting heavy soil bags alone, and keep electrical equipment away from water.
Test the Soil and Prepare a Safe Planting Area
A soil test comes before buying fertilizer. Ask your state extension laboratory how to sample for soil pH and nutrients. Fertilizer decisions should follow that report and the crops you intend to plant.
If your yard borders an older building, busy road, former industrial property, or unknown fill, request a separate lead and other relevant metal assessment. The U.S. Environmental Protection Agency recommends testing and using clean raised-bed soil or containers where contamination poses a risk. Compost does not remove lead.
For safe native ground, remove sod and established weeds. Loosen the soil when it is moist but not sticky. Incorporate finished compost as appropriate for the soil and local extension advice. Do not till saturated soil or add fertilizer just because a bag recommends it.
Avoid raw animal manure in a first-year food bed. It can carry human pathogens. The USDA National Organic Program rules explained by USDA AMS require at least 120 days between soil incorporation and harvest when edible portions contact soil, or 90 days for other crops in certified organic production. Those intervals are not a substitute for safe home handling. Finished, properly managed compost is simpler.
Buy Only What the First Season Needs
Start with a soil test, the selected seed packets, and one or two healthy transplants. Add a hand trowel, garden fork or spade, sturdy gloves, a watering can or hose, and a tool for measuring plant spacing. A small rake, plant labels, and mulch help with routine maintenance.
Buy a tomato cage or stake only if you grow tomatoes. Peas that need support also require a suitable trellis. A soil thermometer and rain gauge can help with planting and watering decisions, but there is no need to purchase indoor lights for a single tomato plant.
Use safe existing ground when possible instead of paying to fill a deep raised bed. Before buying soil in bags or bulk, calculate the required volume. During hot weather, work in cooler hours, drink water, and store tools safely after use.
Pick Crops That Match Your Space and Season
For the first season, combine quick spring greens, one warm-weather crop, and an optional fall planting. Crop choice should follow your actual weather, not an ambitious seed-packet collection.
| Growing period | Good first-year choices | How to start |
|---|---|---|
| Cool spring weather | Leaf lettuce, radishes, garden peas | Sow directly in prepared soil; support climbing pea varieties |
| Warm summer weather | Bush snap beans, one compact tomato variety | Sow beans outdoors in warm soil; purchase a tomato transplant |
| Cooler late summer or fall | Spinach, leaf lettuce, radishes | Direct sow if your regional fall planting window allows |
Select short-season varieties where summers are brief. Where summers are very hot, plan lettuce for spring or fall instead of midsummer. Use the packet’s mature plant size to avoid crowding. Bush beans need no pole-bean trellis, while tomato stems and fruit benefit from cages or stakes.
Use Frost Dates and Soil Temperature, Not Just Your USDA Zone
The USDA Agricultural Research Service’s 2023 Plant Hardiness Zone Map describes extreme winter minimum temperatures. It does not tell you when to sow beans or transplant tomatoes.
Instead, find a nearby weather station’s last spring freeze and first fall freeze dates. The NOAA National Weather Service reports a May 14 mean last 32°F spring freeze at Duluth, Minnesota, using 1991 to 2020 normals. Maryland Extension bases its central Maryland calendar on approximately April 15 for the last spring frost and October 25 for the first fall frost. A historical date is not a frost-free guarantee.
Soil warmth is a second requirement. Maryland Extension advises at least 60°F soil for direct-sowing snap beans and cucumbers. Garden peas can be sown into cooler spring conditions. A basic soil thermometer and local forecast prevent many mistimed plantings.
Follow This First-Year Planting Calendar
The following example is for central Maryland, using the University of Maryland Extension’s August 2026 calendar. It is not a national planting schedule. Northern and high-elevation gardens generally shift warm-season work later; some southern gardens use earlier or different seasonal windows.
| Time | First-year task | Expected crop window in central Maryland |
|---|---|---|
| Winter to early spring | Choose the site, test soil, plan the layout, obtain supplies | Preparation before sowing |
| Mid-March through April | Sow radishes, leaf lettuce, and garden peas into workable soil | Radishes from mid-April; peas from May; leaf lettuce from late April |
| May through June | Set out hardened-off tomato transplants after frost danger; sow bush snap beans once soil reaches 60°F | Tomatoes generally July through October; snap beans July through mid-October |
| July through August | Harvest mature summer crops; replant space with appropriate fall greens | Fall leaf lettuce and spinach depend on sowing dates and conditions |
| August through October | Sow fall spinach or radishes while regional windows remain open; harvest and clean spent areas | Fall spinach roughly mid-September through mid-December |
| After the last harvest | Remove spent plants, clean tools, and record what grew well | Use observations to plan next spring |
If you start in midsummer, skip the spring schedule. Plant crops that still have enough time before the local first frost. Read each variety’s maturity estimate and remember that slower growth in cool fall weather can delay harvest.
Plant Seeds and Transplants Without Crowding
Sow radishes, peas, lettuce, and bush snap beans directly where they will grow. Follow each packet’s planting depth and final spacing. Keep the upper soil moist while germination occurs, then thin seedlings before they crowd one another.
For bush snap beans, Maryland Extension’s January 2026 guide lists 2 to 4 inches between plants and 24 to 30 inches between rows. If your chosen variety calls for 4-inch final spacing, an 8-foot row has 96 ÷ 4 = 24 planting positions. This is a spacing example, not a promised harvest or germination count.
Buy a healthy, compact tomato transplant rather than building an indoor seed-starting system for one plant. Gradually expose nursery or indoor-grown seedlings to outdoor sun, wind, and temperature before setting them out. This is called hardening off. Transplant after frost danger in warm soil, water the root area, and install the support while the plant is small.
Reuse the Same Beds Across the Seasons
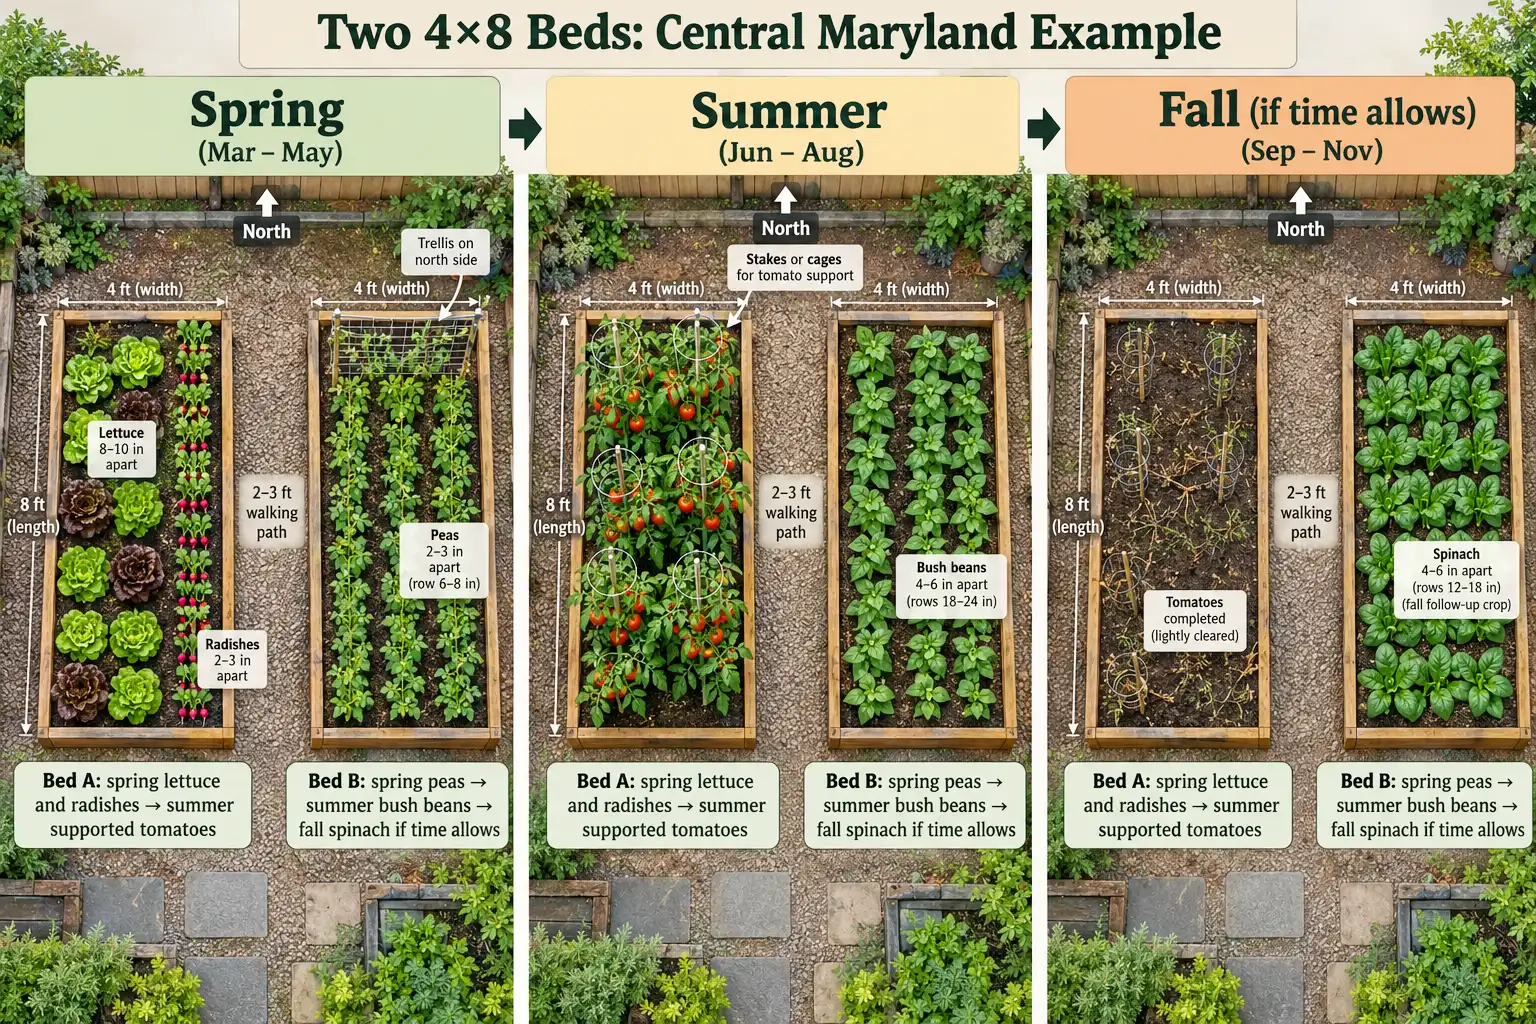
The example below is a possible two-bed plan for central Maryland, not a claim that all crops can share each bed at the same time. It works best when you remove finished spring plantings promptly.
Bed A, 4 by 8 feet: Sow leaf lettuce and radishes in early spring. After those crops finish, plant one or two properly spaced, supported determinate tomatoes. Leave room around their mature canopies. Continue harvesting tomatoes until cold weather ends the season.
Bed B, 4 by 8 feet: Grow spring peas on a trellis at the north edge. When that planting finishes, replace it with bush snap beans if enough warm growing time remains. If the beans finish early enough, sow fall spinach in the cleared space. Otherwise, skip spinach instead of crowding the beans.
Place the paths between beds, not through the planted soil. Check cultivar height, spacing, and your local calendar before copying the layout. A single-bed garden can use either bed’s sequence.
Calculate Soil Before Buying and Water Before Pouring
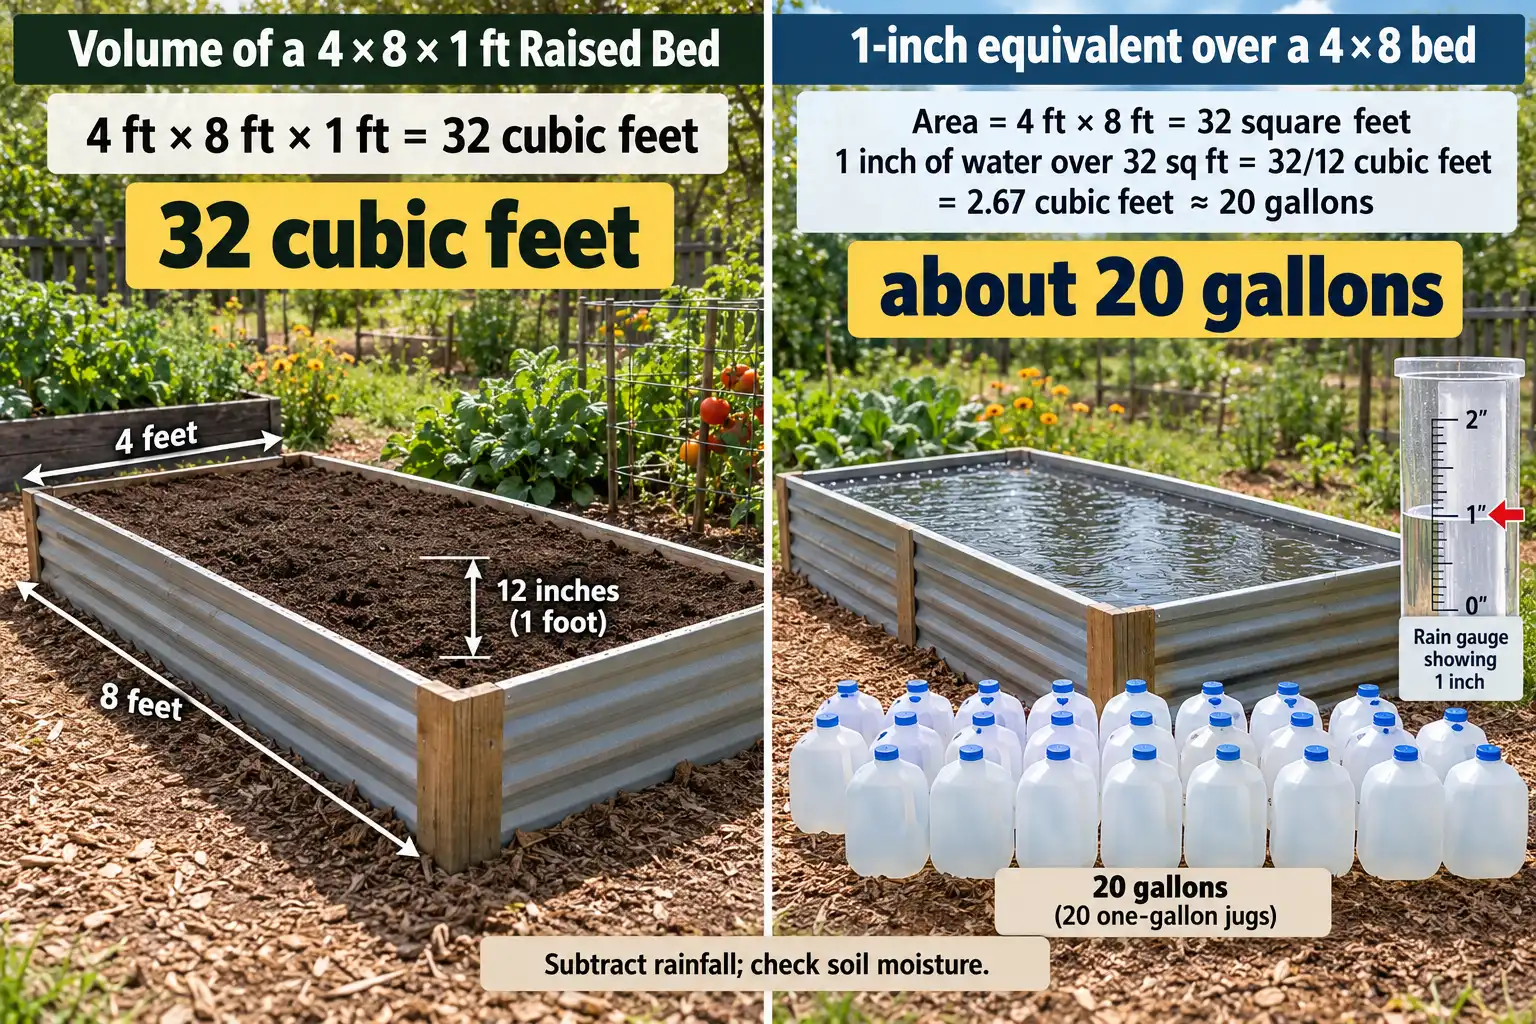
A raised bed can require more soil than its footprint suggests. For one 4-by-8-foot bed filled 12 inches deep, the calculation is:
4 ft × 8 ft × 1 ft = 32 cubic feet of growing medium. That equals 16 bags labeled 2 cubic feet each, or about 1.19 cubic yards because one cubic yard is 27 cubic feet. Two beds at that fill depth require 64 cubic feet before accounting for settling. Measure the actual interior dimensions. Open-bottom beds over safe native soil may not need that much imported material.
Water also has a measurable volume. The University of Minnesota Extension describes about 20 gallons over a 4-by-8-foot bed as the equivalent of one inch of water. The arithmetic is 32 square feet × 0.62 gallon per square foot = 19.84 gallons. This is a depth conversion, not a daily watering order. Count rainfall and adjust for the crop, soil moisture, and heat.
Keep Up With the Garden Without Making It Complicated
Make a brief daily check of soil moisture, new seedlings, weeds, leaves, and ready produce. Water at the base when the root zone needs it, preferably in the morning. New seedbeds need gentle moisture near the surface. Established plants usually benefit from deeper watering rather than constant shallow sprinkling.
Mulch open soil to slow evaporation and suppress weeds, keeping mulch away from stems. Pull small weeds before they set seed. Check tomato supports after wind or storms. Harvest beans promptly when pods reach the size recommended for the cultivar.
Use an integrated pest management approach: identify the problem, remove avoidable stress, and choose low-risk controls before considering pesticides. If any pesticide is used, its current label governs use. Protect bees, prevent drift and runoff, and keep children and pets away from hazards. No routine spraying is required for a beginner plan.
Troubleshoot the Cause Before Changing Everything
A struggling vegetable plant does not always need fertilizer. Several common problems share symptoms. If the cause is unclear, send photographs and growing details to your county extension office, Master Gardener program, or plant diagnostic laboratory.
| What you notice | Possible explanations | First useful check |
|---|---|---|
| Seeds fail to emerge | Soil too cold, planting too deep, drying, rotting, or old seed | Compare soil temperature and packet directions |
| Seedlings look stretched | Inadequate light or crowding | Check direct sun and final spacing |
| Leaves turn yellow or plants wilt | Water stress, poor drainage, nutrient imbalance, or disease | Feel soil below the surface; review soil test |
| Holes or spots appear on leaves | Insects, slugs, weather damage, or infection | Inspect both leaf surfaces and record spread |
| Plants have flowers but few fruits | Heat stress, poor pollination, or variety and weather effects | Check recent temperatures and crop-specific guidance |
Do not identify a pest or disease from a single symptom. Avoid adding nutrients, water, or treatments until there is evidence they are needed.
Harvest, Clean Up, and Plan the Second Year
Harvest dates depend on the cultivar and conditions. For central Maryland, the Maryland Extension guide lists 50 to 60 days from sowing for bush snap beans, while its tomato guidance gives 65 to 90 days after transplanting for many tomato types. Use the seed packet’s maturity estimate as a starting point, not a fixed deadline.
Pick ripe produce regularly, avoid damaged portions, and rinse edible crops under clean running water. Wash hands and tools after working in soil. Keep harvested food away from unclean garden surfaces.
After the final harvest, remove spent crop debris and weeds. Ask extension staff how to handle plants with suspected infectious disease. Cover bare soil to reduce erosion, then record sowing dates, frost damage, rainfall gaps, pest observations, and harvest timing. Next year, change only the parts of the plan that caused problems.
FAQs about Beginner Vegetable Garden Plan
Is one 4-by-8-foot bed enough for a beginner?
Yes. A 4-by-8-foot bed provides 32 square feet, enough for a modest succession of greens, beans, or a supported tomato. Choose plants that fit their mature size, and add another bed only when care feels manageable.
Can I start a vegetable garden without a yard?
Yes. A sunny balcony or patio can support vegetables in containers with drainage and enough room for roots. Use clean container growing mix, check moisture often, and confirm that the structure can support wet soil and water safely.
What month should I plant my first vegetable seeds?
There is no single month for every US region. Use your county extension planting calendar, the local spring and fall frost data, and the crop’s soil-temperature needs. Peas and lettuce usually precede warm-soil crops such as bush beans.
Should I start seeds indoors or purchase seedlings?
Direct sow crops such as peas, radishes, and bush beans. For a small first garden, buying one healthy tomato transplant is often simpler than raising it indoors under lights. Harden off transplants before planting outdoors.
How often should a new vegetable garden be watered?
Water according to rainfall, the crop, soil type, and root-zone moisture, not a fixed daily schedule. Check seedbeds frequently, especially during germination. Give established plants deeper watering when needed, and avoid leaving roots waterlogged.
Why did my first planting fail to sprout?
Cold soil, excessive moisture, dry seedbeds, incorrect depth, or weak seed can all delay emergence. Check the packet, soil temperature, and moisture before reseeding. If seedlings disappear or rot, ask your county extension service for help.
Can I grow vegetables again in the fall?
Often, yes. Cool-season crops such as spinach, radishes, and leaf lettuce can follow summer plants where the local fall window allows. Compare remaining days with the variety’s maturity estimate, and account for slower growth in cooler weather.
What to Do First
Choose the sunniest practical spot, identify your local planting calendar, and test the soil before spending heavily on beds or plants. Start with crops you will eat, observe them regularly, and treat the first season as a plan you can improve from actual records.